Last checked: September 25, 2026 with Project Zomboid Build 42.20 (Stable since 07/29/2026); Build 41 now only runs via the legacy41 beta branch. Build 41 mods do not automatically work on a Build 42 server: packages without a 42/ or common/ folder are ignored without any error message. Check the Workshop for the "Build 42" tag.
You install Project Zomboid mods on a server via the server configuration file Zomboid/Server/<servername>.ini (by default servertest.ini): You enter the numeric Steam Workshop IDs under WorkshopItems and the internal Mod IDs under Mods, sort the dependencies correctly and restart the server. Players then automatically download the required Workshop content via Steam when they connect.
Requirements
You need access to the configuration files of your Project Zomboid server, ideally with a file editor, a restart function and server logs. With paid multi-game hosting like game-serverhosting, what matters most is that you save changes in a traceable way, trigger the restart in a controlled manner and, if problems occur, can check the logs or give support the specific error messages.
You also need the mod pages in the official Steam Workshop for Project Zomboid. This source is authoritative for Workshop IDs, descriptions, dependencies and update notes of the respective Workshop entries. Always check there before installing whether a mod is described as compatible with your game version and your existing mods.
If you would like to set up the server itself first, the internal guide on how to rent and set up a Project Zomboid server is the right fit. For similar Workshop and mod workflows in other games, the guides on ARK mods via the Steam Workshop and Factorio mods on the server are also helpful.
Installing Steam Workshop Mods
1. Choose mods and note the IDs
Open the mod you want in the Steam Workshop. The Workshop ID is the number in the URL of the Workshop entry. Also note the internal Mod ID. The authoritative value is the id= field in the mod.info file (for Build 42 mods in the 42/ folder); the value in the Workshop description is only a copy of it. Pay attention to upper and lower case.
Important: the Workshop ID and the Mod ID are two different values. The Workshop ID is numeric, while the Mod ID is usually a name or technical identifier. Project Zomboid needs both so that the server can load the Workshop files and activate the right mod.
2. Edit the server ini
Enter the values in your <servername>.ini (at game-serverhosting, the mod section in the panel does this for you as soon as you install a Workshop mod). The existing structure stays the same: multiple entries are separated by semicolons.
WorkshopItems=2297098490;2200148440
Mods=Arsenal(26)GunFighter;Brita
This example applies to Build 41 (legacy41). On a Build 42 server you need mods that carry the "Build 42" tag in the Workshop; the format of the two lists is identical.
WorkshopItems contains the Workshop IDs, i.e. the numbers from the Steam Workshop URLs. Mods contains the internal mod names. Both lists should match the selection of installed mods and be cleanly separated. If you remove a mod, remove it consistently from both lines so that no orphaned entries remain.
3. Check the order and dependencies
Some mods require other mods. Such dependencies must be installed as well. As a rule of thumb:
- Libraries first, for example
tsarslib - Main mods next
- Patches and compatibility mods last
The exact order depends on the information given by the respective mod authors. If a Workshop page specifies a particular load order, follow it. If there is no clear specification, only change a few mods at a time and test afterwards, instead of adopting a large mod list without checking it.
Mod IDs vs. Workshop IDs
| Field | Meaning | Example |
|---|---|---|
WorkshopItems |
Workshop ID, the number from the Steam URL | 2297098490 |
Mods |
Internal Mod ID from mod.info (id=) |
Arsenal(26)GunFighter |
Both must be maintained correctly. A common source of errors is entering only the Workshop ID. In that case the server can download files, but the actual mod is not properly activated. Conversely, a Mod ID without a Workshop ID is not enough either, because the server then lacks the Workshop source.
With Us: Paste a Workshop Link Instead of Maintaining Two Lists
The method above is the universal one — it works with any host and explains what happens in the background. On our servers you don't have to go that route.
In the server panel there is a mod manager under Server & Mods. After you paste a Workshop link, the panel can take over the details from the description. Still check the resulting entries against id= in the downloaded mod.info: Workshop descriptions can be outdated or list several alternative Mod IDs. The manufacturer reference for mod metadata also distinguishes between the internal ID, the Workshop ID and required mods.
The automatic takeover saves you typing. You still have to verify whether the activated components match your build version, world and dependencies.
- Multiple components per Workshop entry: A single file can contain a library, a main mod and optional variants. Activate the IDs the author requires; a mere difference between the number of Workshop IDs and Mod IDs does not prove an input error.
- Formatted descriptions: Brackets and capitalization can be part of the ID.
mod.inforemains authoritative, not the visible mod title. - Loading errors: Even a successfully downloaded package can fail at server start. Read the startup log and test joining.
The order remains your decision regardless: libraries before the mods that need them. The panel takes care of the entering for you, not the thinking about dependencies.
Example Mod List from the Original Version
The following table preserves the existing mod examples. Before using them, check in the Steam Workshop whether the entries are still suitable for your server version, game version and mod combination.
| Mod | Workshop ID | Description |
|---|---|---|
| Brita's Weapon Pack | 2200148440 | Hundreds of weapons (Build 41; only unofficial ports for B42) |
| Arsenal GunFighter | 2297098490 | Weapon animations (Build 41) |
| [B41] Expanded Helicopter Events | 2458631365 | More events (Build 41; third-party B42 ports) |
| Raven Creek | 2196102849 | New town (Build 41) |
| Raven Creek B42 | 3484263516 | Community port for Build 42, Mod ID RavenCreekB42 |
| Filibuster Rhymes' Certified Used Cars [B42.19] | 3683878228 | More cars for Build 42 |
Hydrocraft has no verifiably maintained Build 42 entry. Before every installation, check the build tag and the date of the last update on the Workshop page.
Restart the Server and Verify the Result
Save the server ini and restart the server; the server only loads Workshop content at startup. Then connect with a client that is logged in to Steam. If the mod list is correct, Project Zomboid requests the required Workshop content when connecting or downloads it automatically.
Then check three things: the server starts without critical mod errors, the client can join, and the expected content appears in the game. For map mods, you additionally enter the map folder in Map=, for example Map=RavenCreek;Muldraugh, KY; Muldraugh, KY must always remain the last entry. In existing worlds, map, vehicle or loot mods may, depending on the mod, only become visible in new or not yet explored areas.
Troubleshooting
The server doesn't start after a mod change
First check the most recently changed entries in WorkshopItems and Mods. Test the most recently added mod on a copy of the save, separate from the live save, and read the startup log. Do not hastily load an existing world with content mods without those mods and then save it. Common causes are missing dependencies, typos in Mod IDs or a mod that doesn't match the game version in use.
Players get stuck in the mod download when connecting
Have the player completely close and restart Project Zomboid and Steam. Also check whether the mod is still available in the Workshop and whether the Workshop ID was entered correctly. If several players are affected, a mod author has usually just published an update: the clients load it immediately, your server only at the next start. Stop the server in a controlled manner and check at the next start whether the Workshop download finishes completely. Then compare the mod version and build on server and client; a restart alone does not guarantee a successful update.
A mod isn't active even though it is downloaded
Then the internal Mod ID is often wrong or missing. Compare the entry in Mods with id= in the downloaded mod.info; the Workshop page is only additional guidance. Watch for brackets, capitalization and special characters, because Mod IDs are technical identifiers and don't always match the visible mod title.
Errors in the world after removing a mod
Some mods write data into savegames. Therefore, don't remove mods from live worlds without checking. Create a backup beforehand and test the change on a copy or at a maintenance window. Mods that extend maps, vehicles, items, traits or crafting systems are particularly risky.
FAQ
Do players have to install mods manually?
As a rule, players automatically download the required Workshop mods when connecting, provided the server configuration is correct and Steam provides the Workshop content. Manual steps may become necessary if local Workshop files are corrupted or Steam doesn't update the download cleanly.
Is the Workshop ID alone enough?
No. For a Project Zomboid server you normally need the Workshop ID in WorkshopItems and the internal Mod ID in Mods. The Workshop ID describes the source, while the Mod ID activates the specific content in the game.
Where do I find the right Mod ID?
The authoritative value is the internal Mod ID in the id= field of the downloaded mod.info; for Build 42 mods you will find it in the 42/ folder. The Workshop description and notes from the author help with the selection, but may be outdated. If there are multiple IDs, check the required components and the variant you want.
Can I install many mods at once?
Technically a long mod list is possible, but for stable changes a step-by-step approach is better. Install a few mods, restart the server, test joining and check the logs. That way you find conflicts much faster.
What do I do about mod conflicts?
Reduce the mod list to a working core and then add mods back one by one or in small groups. Observe the dependencies, load order notes and compatibility patches from the mod authors.
Project Zomboid: view an example
Our own captures from a demonstration environment. The version and setup shown may differ from your server.
- Open the Workshop browser, search for your mod, and open the result.
- Choose a version, then add it to your server.
- The success message confirms it was added.
- Restart the server to load the Workshop mods.
- After the restart and mod scan, check the installed list.
- A mod without server settings may have in-game options under Options, then Mods, often for admins only.
- A mod with server settings names its group in the sandbox editor.
- Follow the link, open that group, and adjust the options you need.
- Save changes when you’re ready.
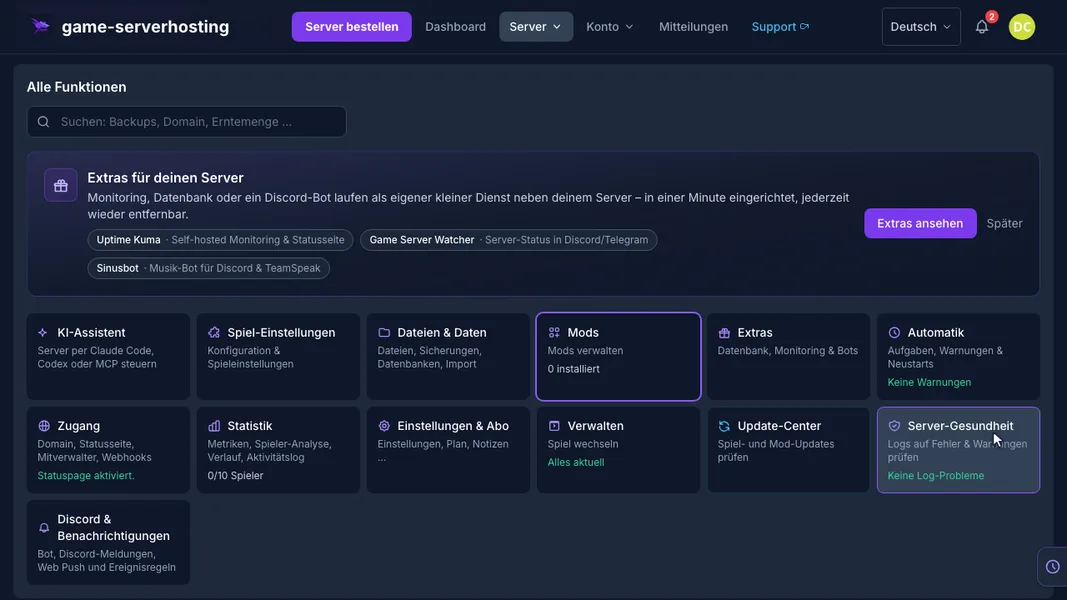
Project Zomboid Build 42 · Kundenpanel dev · 2026-09-25
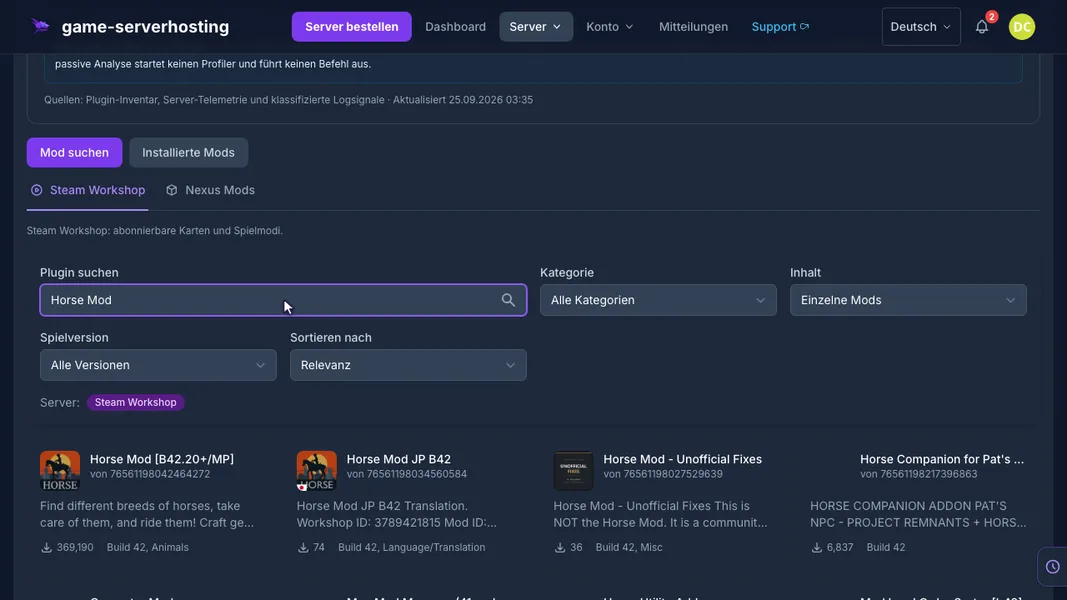
Project Zomboid Build 42 · Kundenpanel dev · 2026-09-25
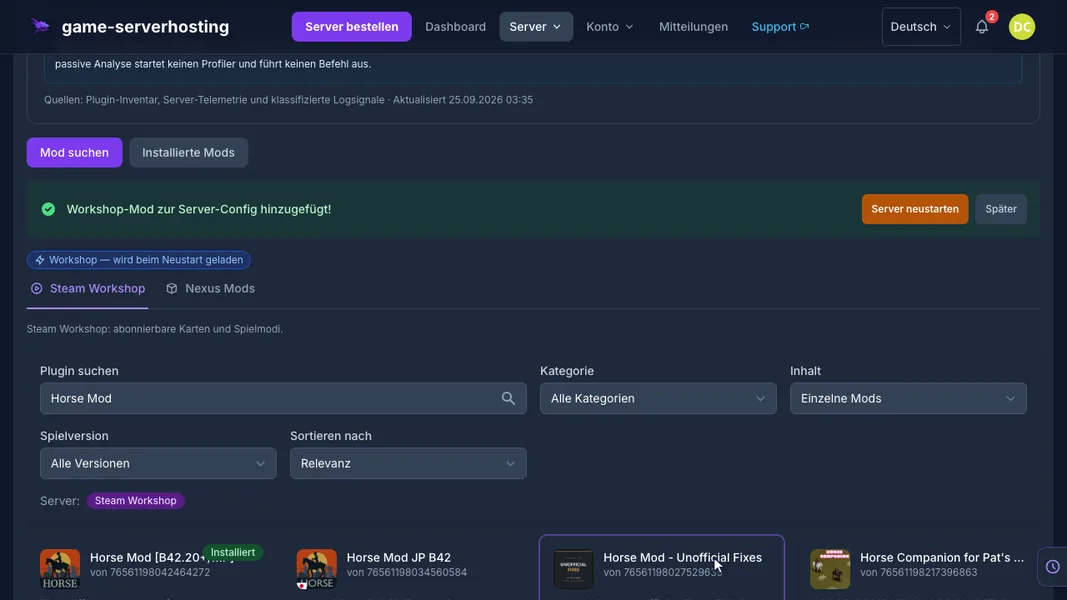
Project Zomboid Build 42 · Kundenpanel dev · 2026-09-25